How To Start a Blog: Step-By-Step Beginner’s Guide

Have you ever thought about starting a blog? Maybe you’ve seen others turn their passions into thriving online businesses, or perhaps you just want to share your ideas with the world.
Whatever the reason, there’s never been a better time to start a blog, and you’re in the right place to learn how.
Why Blogging is the Best Decision You’ll Make This Year
Imagine waking up every morning, logging into your blog, and seeing your latest post getting hundreds, maybe even thousands of views.
Now, imagine that those views are turning into real money, month after month, giving you the financial freedom to live life on your own terms.
That’s not just a dream. It’s the reality for countless bloggers (myself included) who started just like you.
Blogging is more than just writing, it’s about building a platform that can grow into a significant income stream that you can keep for years on end.
But Why Start a Blog Now?
The online world is booming, and people are searching for content that resonates with them. Whether you want to create a personal brand, share your knowledge, or turn your hobby into a business, a blog is the foundation that can make it all happen.
And here’s the best part: you don’t need to be a tech genius or a marketing expert to succeed. With the right guidance, you can set up a professional-looking blog in minutes and start creating content that attracts readers and generates income.
Real Results: What Blogging Can Do For You
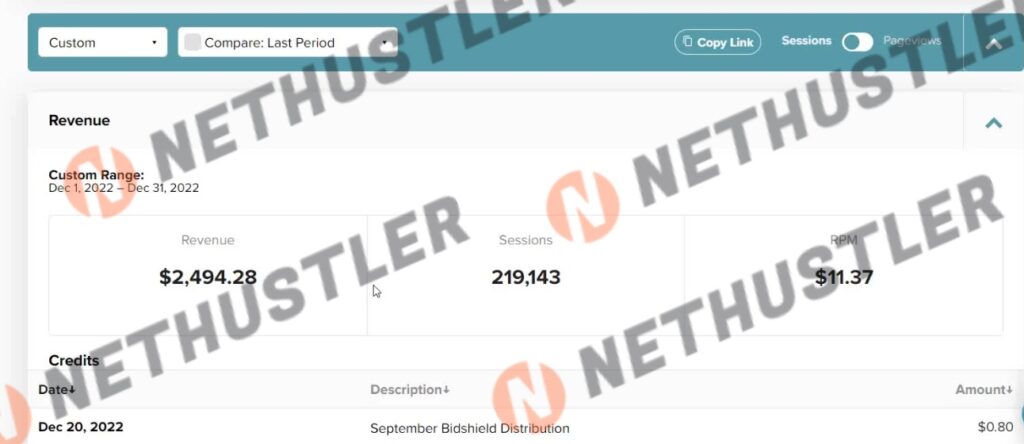
Let me show you exactly what’s possible. Take a look at some of the ad display revenue from one of my blogs (I’ve since sold this blog, for 20 x monthly revenue, which is a great bonus of running a blog)
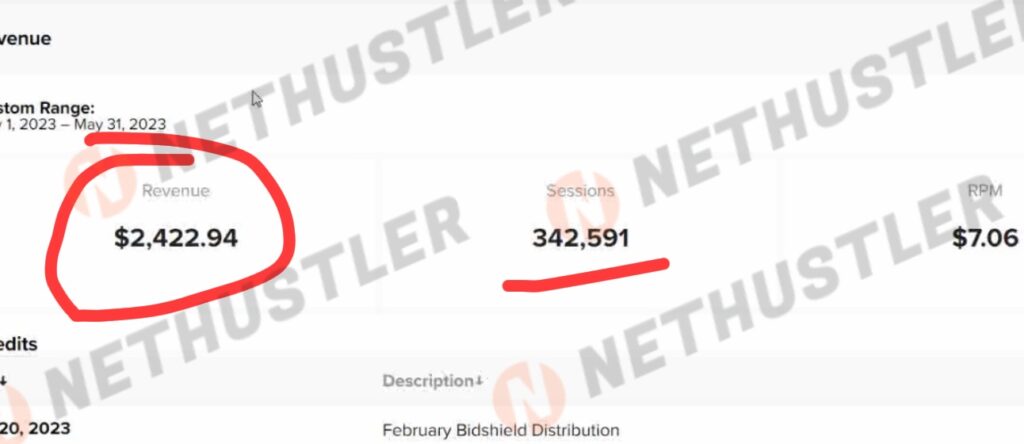
This is real revenue, earned every month just by sharing content and providing value to readers.
If you want to have monthly revenue like this, then you need to start a blog right away. Don’t just sit on the sidelines watching others succeed. You have the potential to create something amazing, and I’m here to help you every step of the way.
Ready to Get Started?
In this guide, I’m going to walk you through everything you need to know from choosing the perfect niche to setting up your blog with ease, all the way to creating content that will attract readers and drive income.
Plus, I’ll show you how to secure a hosting deal that includes a free domain, making it easier than ever to get started.
So, are you ready to take the first step toward building your online empire? Let’s dive in and make your blogging dreams a reality!
How To Start a Blog in 10 Easy Steps
Starting a blog is easier than ever, and with this guide, you’ll be up and running in no time, even if it’s your first try!
Since you will also have to read these step-by-step instructions on how to start a blog, expect anywhere from 20 to 30 minutes in total to go over everything.
Blogging For Beginners
Ready to dive in? Let’s focus on the five key steps that will get your blog launched today!
1. You need to pick a niche
This one is pretty straightforward, a niche is basically the topic of your blog. So if you like photography and you would like to start a photography blog, then that’s your niche.
2. Decide on a blogging platform
There are multiple blogging platforms out there, choosing the right one is important, as you will learn later in this guide. However, the majority of blogs on the internet are based on the self-hosted WordPress blogging platform.
Free blogging sites have many limitations, and they are rarely used by people who are serious about blogging.
3. Choose a domain name
This one is pretty easy, to start a blog you will need to first have a domain name. A domain is your unique address for which your blog will be known online. For example NetHustler.com or YourName.com.
4. Get web hosting for your blog
Likewise, in addition to a domain, you will need web hosting. If the name is the address, the hosting is the server that keeps all your files and website online so that it can be accessed by everyone.
Without any of these two things, your blog won’t be accessible. Don’t worry I’ll show you exactly how to do this below.
5. Install themes & plugins
This is the most fun part of creating a blog, at least for me. You can customize your blog’s design to make it uniquely yours and stand out and attract readers from day one. Also, I will show you some good plugins that you should install to make your blog better.
Step 1: Pick a niche for your blog
Choosing your niche is where the magic starts! This is where you decide what your blog will be about: your passion, your expertise, or even a journey you’re on.
The right niche can be the difference between a hobby and a thriving business.
You could in theory write on a number of topics and niches within one blog, but in reality, the most popular blogs focus on just one of them, for example, food, technology, travel, cars, sports.
My recommendation for you is to pick a niche that you’re really passionate about, this will make it easier for you to write content on things that you know, and you will be able to grow your blog faster while helping others by publishing useful and interesting articles.
If your goal is to also make money blogging, then you will have to consider creating a blog that suited for larger audiences. Meaning that you want to have a couple of thousands of monthly readers on your blog.
This then becomes the target audience that you can use and promote products and show ads to so that you can earn money with your blog.
Here’s a couple of ways to come up with a topic for your blog:
- Start a blog about your hobbies & passions (cars, gardening, fishing, gaming, drawing, etc.)
- If you’re an expert at something, then you could create a blog about that.
- Are you on a journey? For example, losing weight? Great, you can share your experiences on your blog to help and inspire others.
- You could also create a personal blog about your life experiences.
By now you should pretty much know a few niche ideas for your blog, write them down, and let’s continue with the guide.
Great job! You’ve taken the first step toward building your dream blog. Let’s keep that momentum going!
Step 2: Select a blogging platform
Choosing the right platform is crucial. I recommend WordPress.org because it’s not just the most popular, it’s the most powerful, giving you total control to customize, monetize, and grow without limits.
I highly recommend you to go with the self-hosted WordPress blog solution, and not get started blogging on a free platform.
Free Hosted Blog Platforms (Blogger & Tumblr)
There are a few free blogging services like Blogger, Tumblr, or WordPress.com but in general, you don’t really want to go with any of those.
Why is that?
It’s simple actually… You see, those free solutions come with limitations such as:
Not having your own custom domain name – instead of YourBlogName.com, you will be forced to use YourBlogName.blogspot.com or YourBlogName.Tumblr.com. That’s not easy to remember and looks unprofessional it also might affect your SEO progress.
Limited monetization options – You won’t be able to really earn as much money as you could if you go with free blogging sites, because you will pretty much be limited to what type of blog monetization methods you are allowed to apply. Some won’t allow you to use affiliate links or banner ads.
You don’t have total control – You don’t have control over the domain name (which is a subdomain in this case) or over the server and hosting of your blog. So you won’t be able to fully do what you want and own your stuff.
You cannot install premium themes – You are basically stuck using only a handful of themes, this will severely impact your design of the entire blog, and its functionality, so again not a good thing. There are some amazing premium themes out there that you will simply not have access to.
You cannot install plugins – This is a massive issue, you won’t be able to install plugins. Plugins are very important as they allow you to better manage your website and get added SEO benefits.
Your blog can be shut down – Many of these free blogging platforms have lots of terms and conditions and rules over what you can do and can’t do while using their services. In some cases that means that they can ban and shut down your blog at any minute.
No Custom Email Address – You won’t get to have a personalized and custom email address such as [email protected]
So essentially you’re better of getting started blogging with a self-hosted WordPress blog as I will explain below. It’s less time-consuming, and cheaper in the long run.
If you want to upgrade your free blogging plan to a paid one to enjoy more benefits, you will end up paying more for less functionality so it’s not worth it.
Self-hosted blog platforms (WordPress.org)
Starting a blog on a self-hosted platform has many advantages and benefits. You will be able to use a full customized domain name such as NetHustler.com instead of NetHustler.wordpress.com. you will also be free to monetize your blog with any method that you want.
But more importantly, control your files and domain and access your server whenever you want.
Out of all the self-hosted blogging software, you should go with the WordPress.org CMS (content management system). This CMS is what powers over 93% of all the blogs in the United States. Yes, it’s that good.
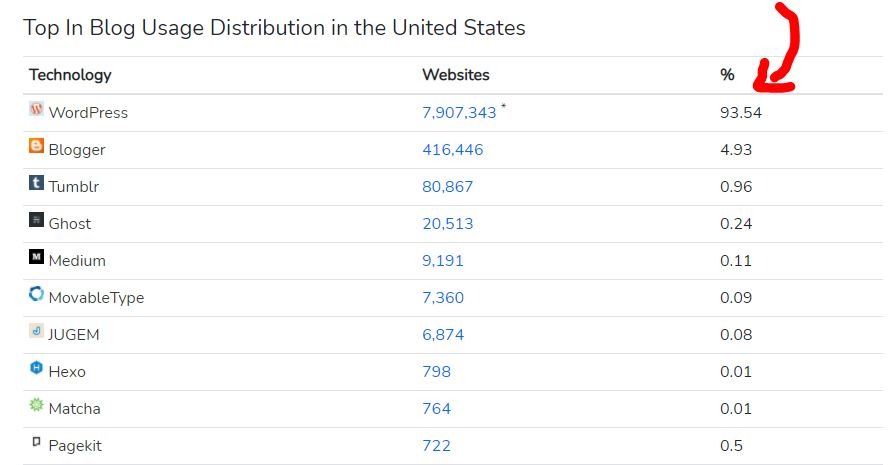
In 2020, over 35% of websites across the globe are powered by WordPress. That’s a huge market share because people are not only just using WordPress for blogging, but it can also be used to create all kinds of websites, thus removing the ability to know how to code in order to create a website.
Now before you get confused, let me explain the difference between WordPress.com and WordPress.org.
WordPress.org – is a stand-alone open-source non-profit blogging tool that you can install on a server and create a blog without limitations, that you can host on your own server and have your own custom domain. This is what I recommend and explain how to do in this ultimate guide.
WordPress.com – is a PAID service, that starts out as a free blog hosting solution based on the WordPress.org version. This service has many limitations in its free plan, and even if you upgrade to a paid plan you won’t be able to enjoy blogging to the fullest. Stay away from this one.
So my recommendation is to always go with the WordPress.org version and get a custom domain and pay for hosting. Especially if you’re serious about it and want to also earn money blogging.
For a couple of dollars a month you can start a blog that looks professional and without any limitations at all.
Speaking of dollars…
How much does it cost to start a blog?
It doesn’t cost that much to get started blogging on a self-hosted platform. In fact, let me break it down for you:
To have a self-hosted blog to enjoy all the freedom and benefits, you will need to have two things:
- Domain name – First thing you need is to figure out a custom domain for your blog, and then register it (more on that below), usually $10-$15 per year.
- Web hosting – The second thing you need is a reliable web hosting service for your blog like Bluehost that is used to keep your files (your whole blog basically) online and accessible to people. A couple of dollars per month.
This guide on how to start a blog was based on Bluehost, and so I’m going to show you how to build a blog using their hosting solution.
Bluehost is pretty cheap and compared to other web hosting solutions it starts out at just $1.99 per month (with my discount), and it also includes a free custom domain and a bunch of other goodies.
Bluehost is one of only 3 recommended hosting solutions by WordPress.org. And for good reason, over 2 million websites are hosted on Bluehost.
Since I’m a partner of Bluehost I managed to get this deal going for you:
- Start with a discounted price of $1.99/month instead of
$8.99 Get a free domain name (usually this costs $10-$15)- Free custom email addresses
- Install and set up a blog in just one click
You’re on a roll! The right platform is the backbone of a successful blog. Let’s keep moving forward!
Step 3: Pick a domain name
A domain name like I’ve said before is a unique address that people will use in order to find your blog and access it. So for example YourDomainName.com.
It only costs about $10 to $15 per year to register and own one, and as long as you keep renewing it annually it will remain yours.
If you create your blog on Bluehost you get the domain name for free for the first year. More on that below.
The price differs depending on the domain registrar that you use, but you don’t have to worry about that, like I’ve said before Bluehost will give you a free custom domain name for the first year.
So after you’ve come up with your niche, now it’s time to brainstorm some name ideas and check and see if they are available to register.
Some general advice to keep in mind when registering a domain for your blog:
Keep it specific – If you’re blogging about a specific niche, then your name should reflect that.
Make it brandable – Your blog’s name should be memorable, don’t make it too long. You want people to easily remember your name.
Don’t use hyphens or numbers – This one is easy, you really don’t want to have these in your name, except maybe if your brand has a number in it already, otherwise, it’s best to avoid hyphens and numbers in your blog’s name.
Try to get a .com – A .com extension is what I recommend you to use when you register your blog’s name. Simply because it is still the most popular extension out there, and it’s easier for people to trust and remember it.
You can however pick any other extension if you really have a great name idea that’s not available on a .com. I would suggest .net or .co next, .org is used more for non-profit organizations.
Sometimes the name you want might be taken, don’t worry, try a different combination or add something to the end of it to make it unique.
If you don’t yet have a name for your blog, you can sign up with Bluehost and set up your blog, and get one set up later.
Plus, like I’ve said before, with Bluehost you get a domain name for free in the first year, and you will be able to do that in the next step.
Nice work! Your blog’s name is its identity. Now, let’s get everything set up for success!
Step 4: Get web hosting for your blog
Web hosting is basically the service that keeps your blog online and accessible 24/7 for other people to come and check it out.
All your blog files such as images, themes, and the content will have to be stored on a web hosting server, otherwise, you will have no way to create a blog.
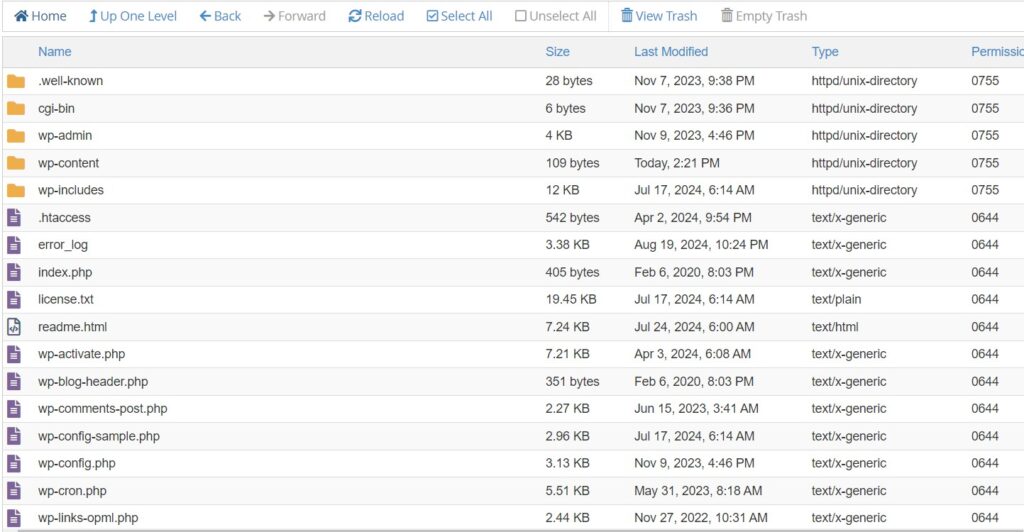
Without a domain or a hosting service, your blog won’t function, it’s as simple as that. So you need both to get started blogging.
Luckily for you, Bluehost, the hosting service that we’re going to use to create a blog, is going to provide you with a free domain name when you buy one of their hosting plans. So you will get to do both things at the same time.
Sure, there are many other ways to do this, but it gets a bit more complicated, and as a beginner, you don’t want that.
For example, you could register a domain with one company and then buy hosting from a different hosting provider.
The problem with that is that you will have to do some manual configurations and correctly set up things like nameservers.
It’s also way more expensive to go that route, because you will have to pay extra for a domain (with Bluehost you get one free for the first year), and the hosting packages on most hosting services start at $5.99/month, which is significantly more than Bluehost’s $1.99/month.
But, since you’re reading this guide you’re probably a blogging beginner, and so one of the easiest and fastest ways to do it without any complicated steps and manual configuration is to go and do it all automatically with Bluehost.
When I started out blogging, that’s what I used, and for a beginner and a new site, it’s more than perfect for its price.
A shared plan is all you really need at first, unless your blog gets 40,000+ visitors a month, then it’s time to upgrade.
There are many other hosting companies out there, but only 3 of them are actually recommended by WordPress.org, and one of them is Bluehost.
Awesome! Your blog is one step closer to going live. Let’s make it happen!
Step 5: Starting a blog on WordPress with Bluehost
Ok, here’s the part where we actually go ahead and create the blog.
Visit the Bluehost website
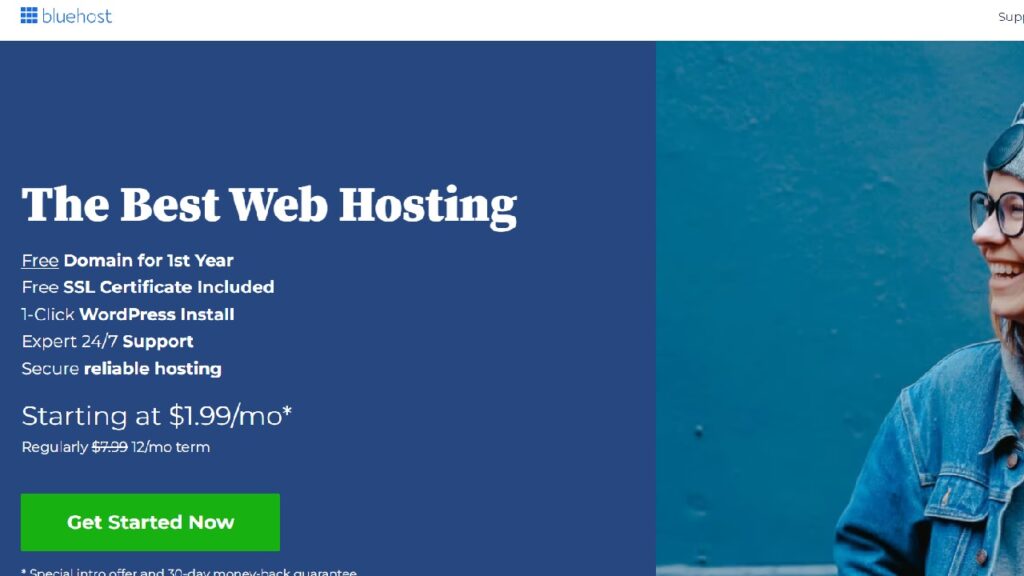
Your first step is to go to the Bluehost website and click on the big green button to get started.
Select a hosting plan
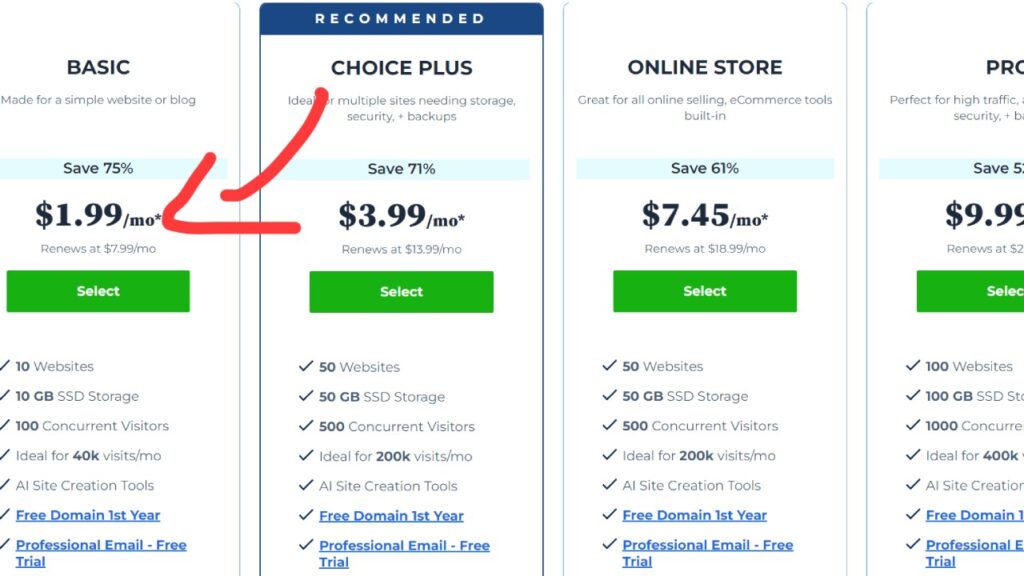
Now you have to select your hosting plan, depending on your budget and what your goals are, you can either go with the Basic package (it’s more than enough for a beginner) or if you can afford to pay a little bit more, you can go with the recommended plan.
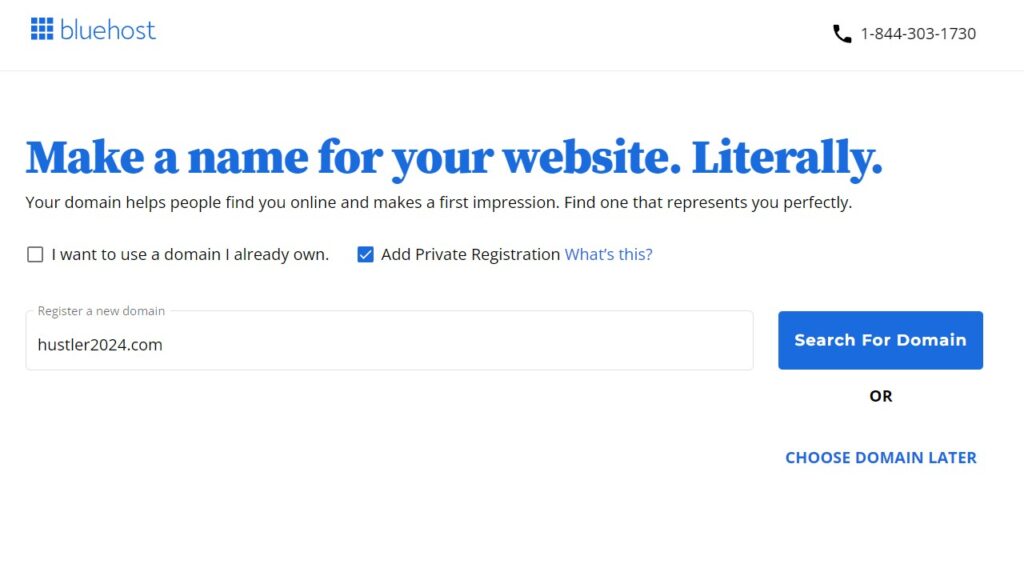
Pick a domain name for your blog
Now here you have two options:
- Option A – If you already have a name idea in mind and it’s available then you can register it straight away.
- Option B – If you don’t have a name yet, don’t worry, you can set up your blog and then add the domain later.
Checkout & Account Creation on Bluehost
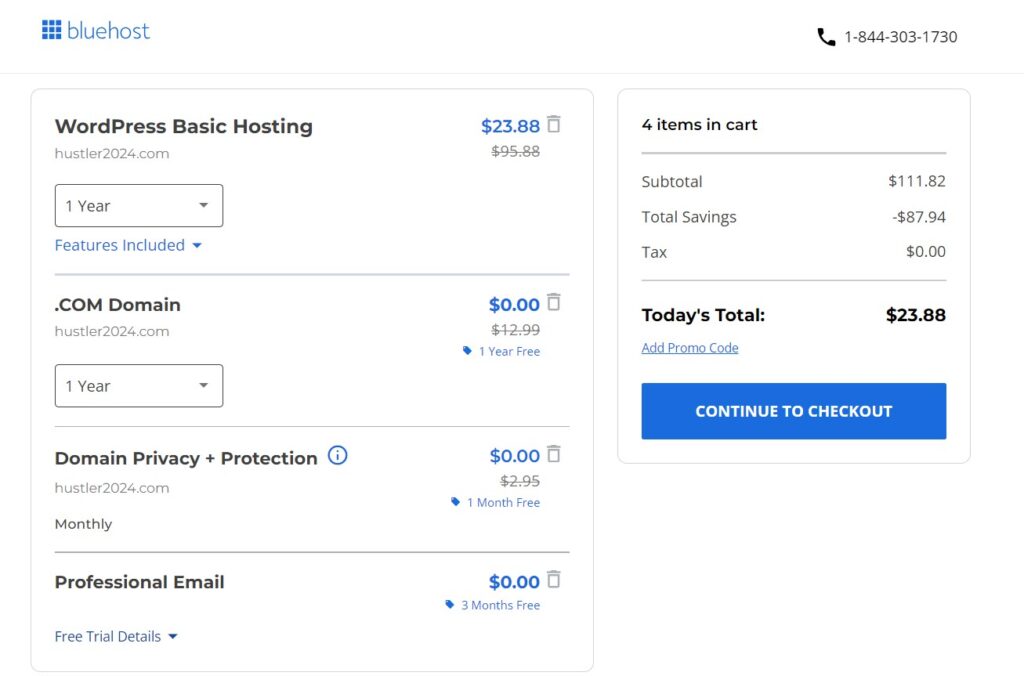
The next step is to checkout and create your Bluehost account. As you can see from the screenshot below, on the Basic plan with my discount you will be able to snag a domain name and hosting for 12 months for a total of $23.88.
Going with the monthly payment route is not recommended because you will not save as much money and you will also have to pay for the domain name which is free on the 12-month plan.
Payment Information
Ok, we’re almost done now, the last step of this is to add your contact and payment info. Start off by adding your personal details such as your name, address, email, and phone number. This info will be used to create your Bluehost account.
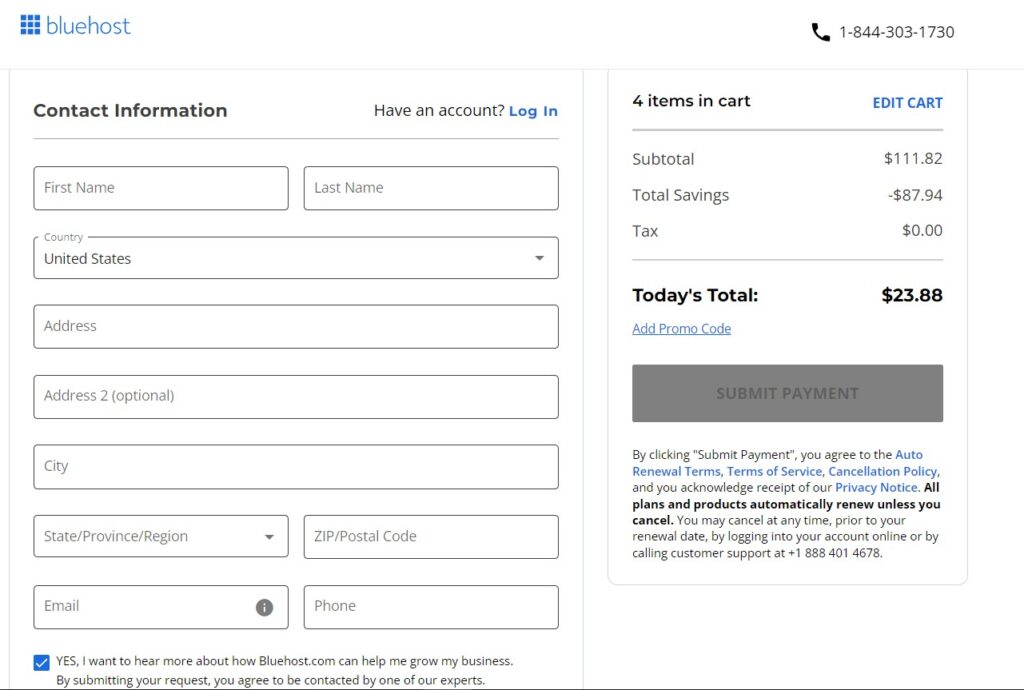
After that, it’s time to choose a password for the account and select your payment option.
By default, you will be asked to pay with a credit card, but you can also pay with PayPal.
Not that many hosting companies have PayPal as an option, so this is great.
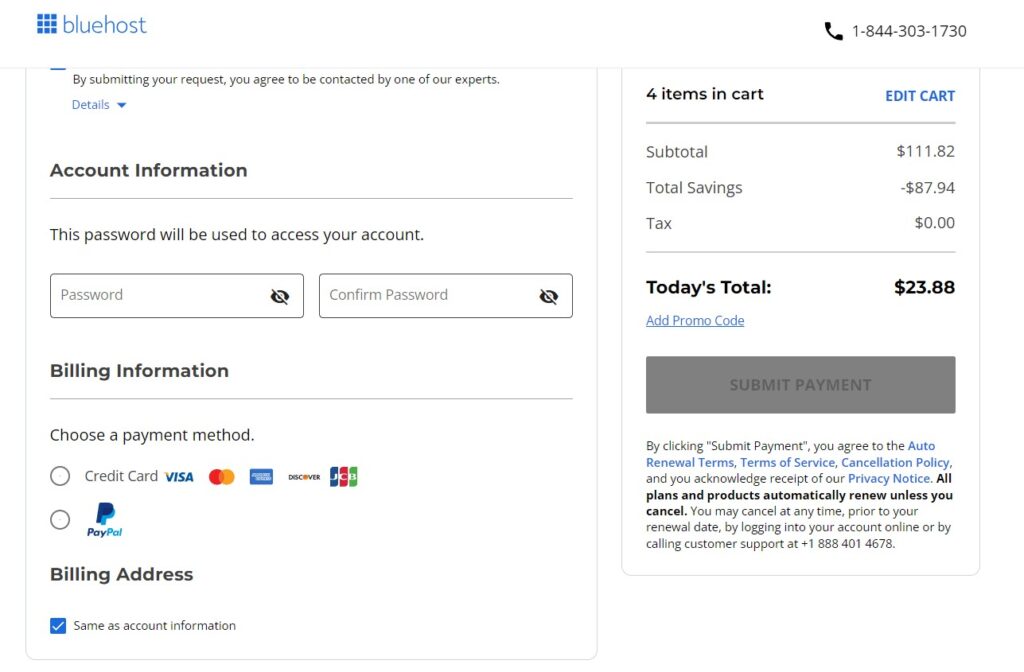
After this, check the box if the billing address is same as the account info (if not then fill in the different details).
You’re now ready to pay and continue with your blog creation on Bluehost. Simply click on submit payment button to proceed.
By the way, $23.88 for the first year is a great deal, and I always prefer to pay in advance this way you don’t have to worry about hosting and monthly payments anymore and just focus on creating content and promoting your blog.
If you think about it from a business perspective, how many businesses can you open up for less than $30? Not that many, that’s for sure.
Setting up your blog on Bluehost
Alright, so here’s where the actual magic happens, after you’ve completed the payment, you will be redirected to log-in to your client’s area.
Note: From here on the images and process below might be slightly different for you as things might have changed slightly on Bluehost and WordPress from the time I wrote this how to start a blog article, but it should still be similar in 2025.
1. Log in to your Bluehost account
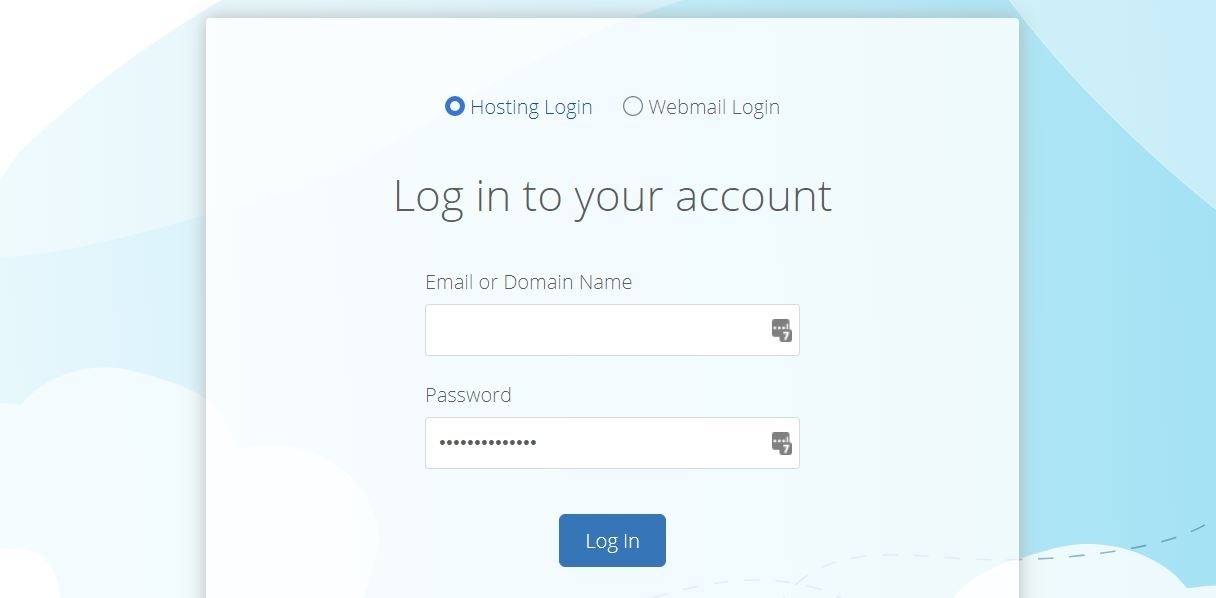
Use the email and password that you have used previously when you have created your account in order to log in to your Bluehost dashboard.
2. Skip unnecessary services
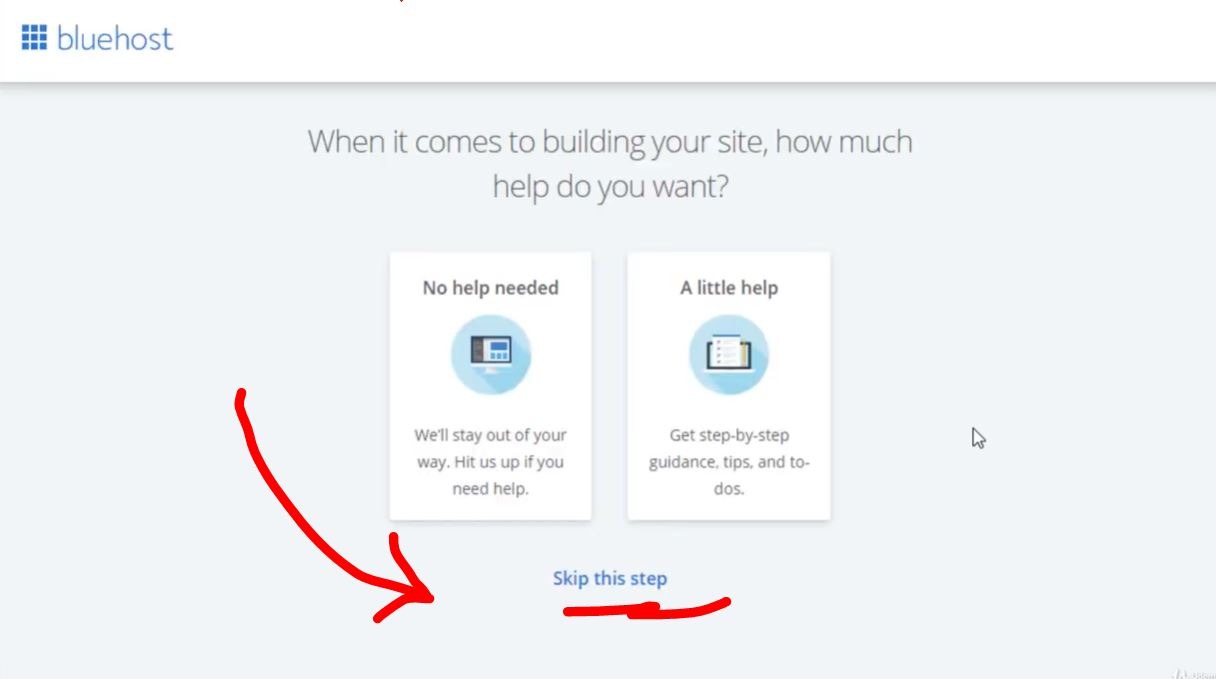
The first time you log in you will be prompted by a series of questions by Bluehost so that they can create the blog for you.
They have a service where they can help you with that but it costs a couple of hundred dollars.
You don’t need that. So skip every step.
Make sure to SKIP all the steps, as I’m going to teach you in this guide how to set up your blog for free.
3. Enter the Bluehost dashboard & Create a site
Next, you will get to see your Bluehost dashboard, it will look like this:
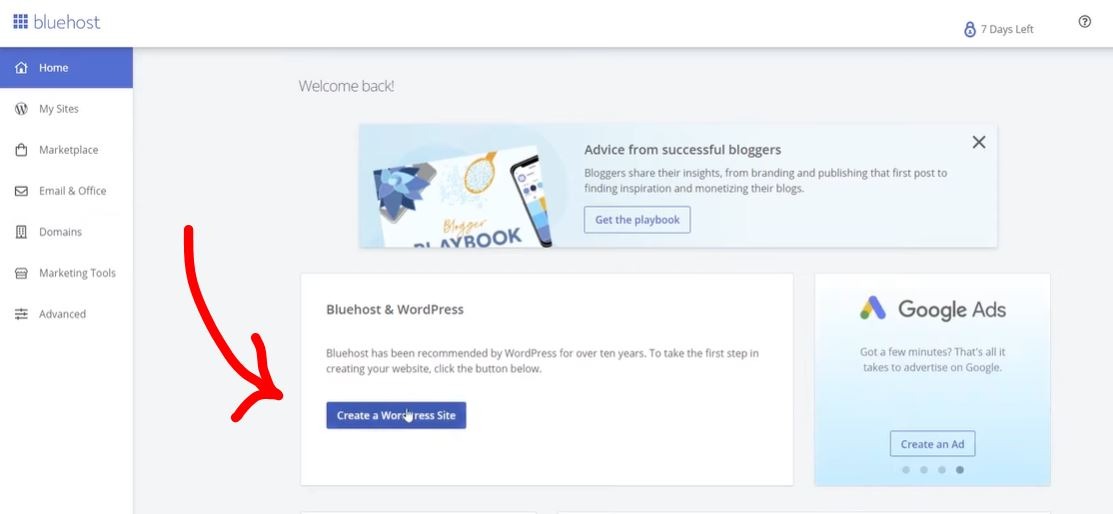
Click on the Create a WordPress button to begin your blog installation.
4. Choose a blog name and a tagline
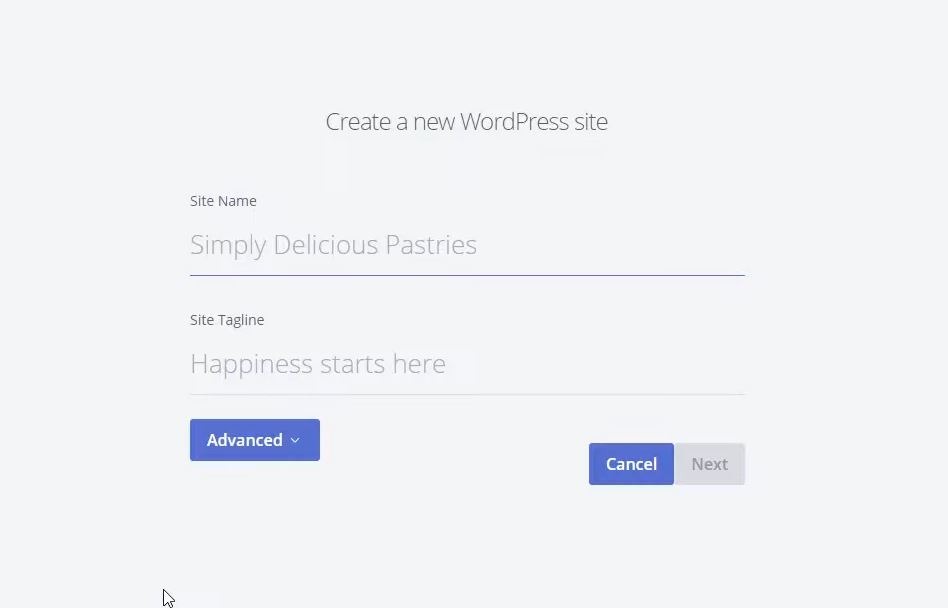
Simply add your blog name and a tagline and click on Next to go to the next step.
5. Choose a domain for your blog
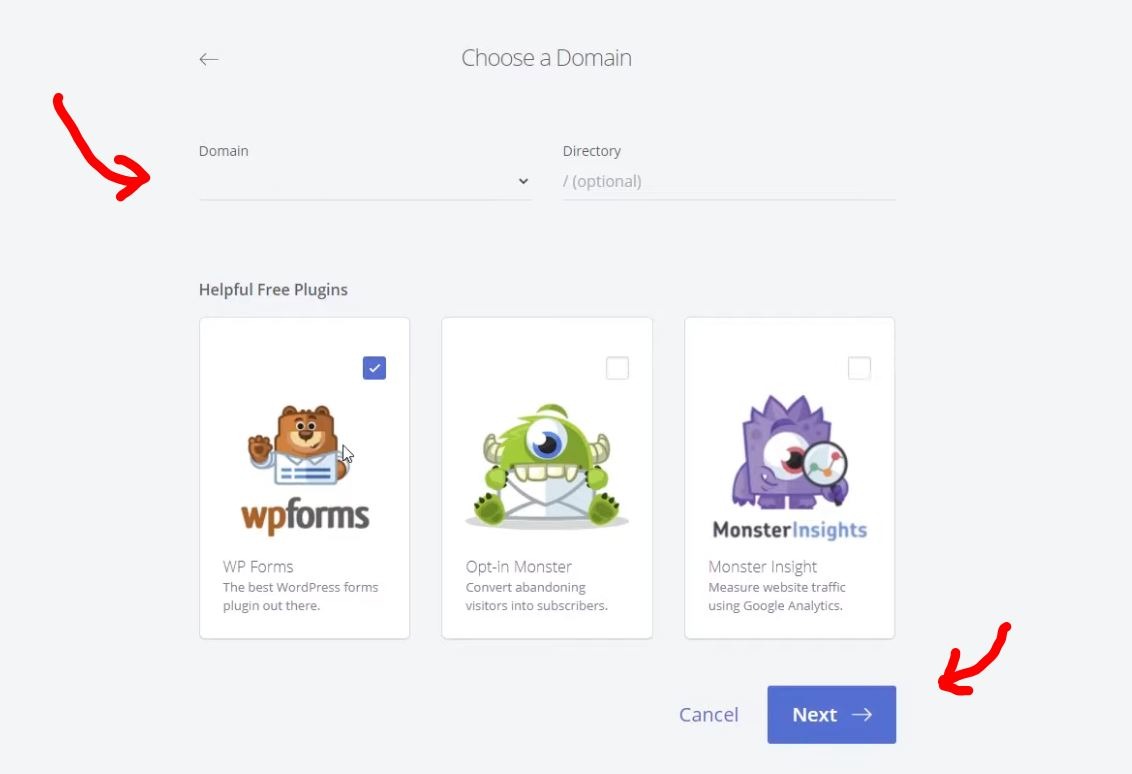
Here you can choose the custom domain name that you have picked up earlier, or simply create a new one. You can also select additional plugins to be installed if you want. I usually install wpforms to easily create contact forms and skip the others.
6. Your WordPress blog installation is now done
After a few seconds, your blog setup will be complete and you will see a page with your blog name, username, and password.
Save these details on a notepad and keep them somewhere safe, either online or offline, it doesn’t matter. You will use them to log in to your blog from now on.
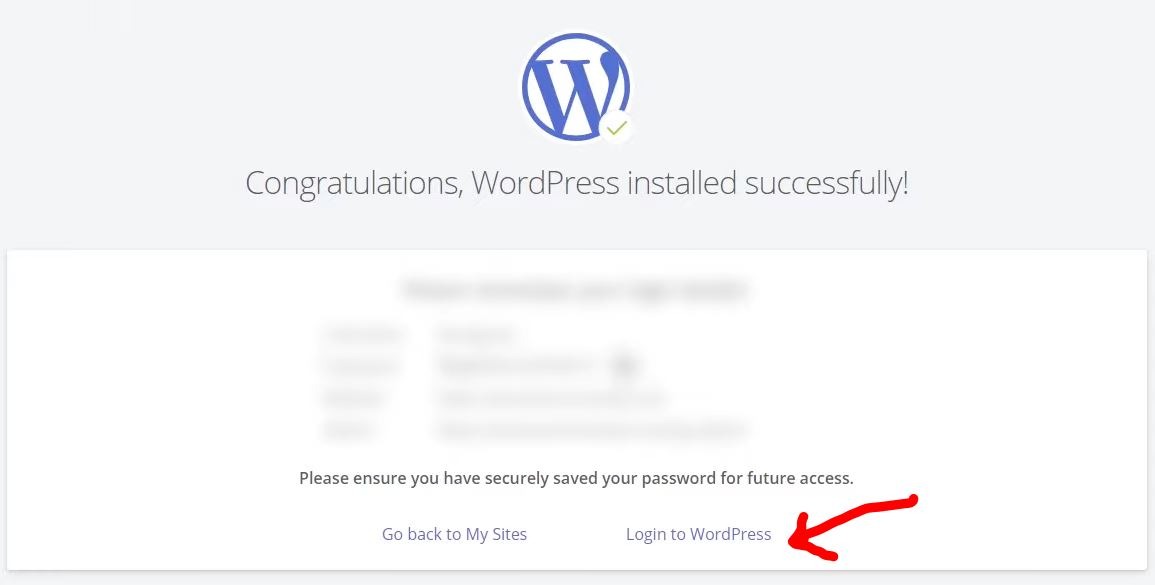
Congrats, you’ve gone over the hard part, now it’s time to have some fun and design a beautiful blog.
Click on the Login to WordPress link to enter your blog’s dashboard.
You’re crushing it! Your blog is officially set up on WordPress. Now, let’s make it look amazing!
Step 6: Select a WordPress theme and design your blog
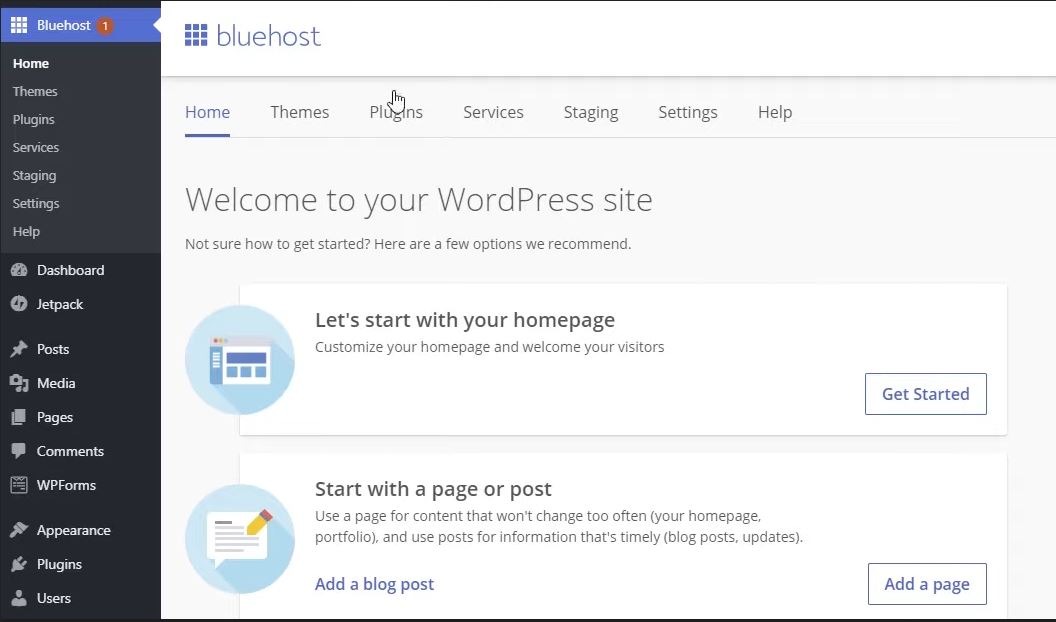
This is your blog dashboard, from here you will do every task related to your blog, such as publishing content, changing the design, installing plugins, and more.
1. Select a blog theme
So let’s get started designing your entire blog by first selecting a theme. To do that, head over to the menu on the left side of the screen and click on Appearance and then select Themes.
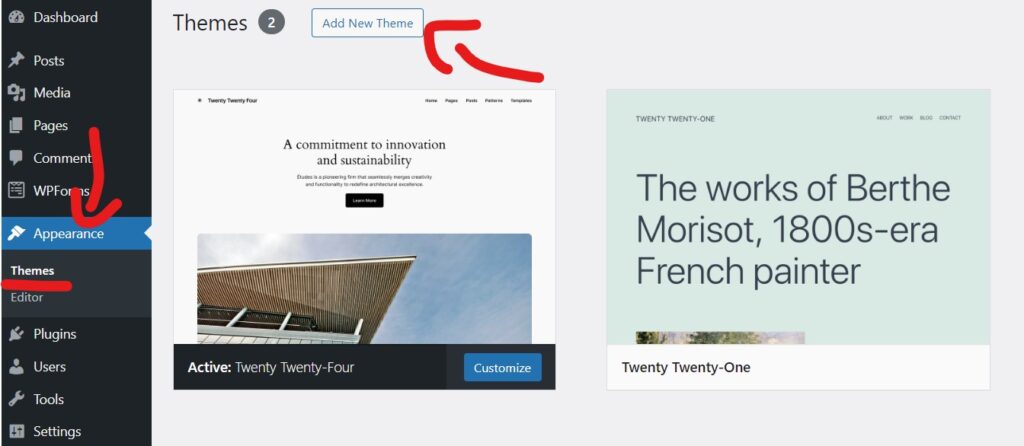
Your blog comes with a default theme installed called Twenty Twenty-Four, you could either use that or click on the “Add new” button to choose another theme.
I recommend you choose another theme instead of the default one.
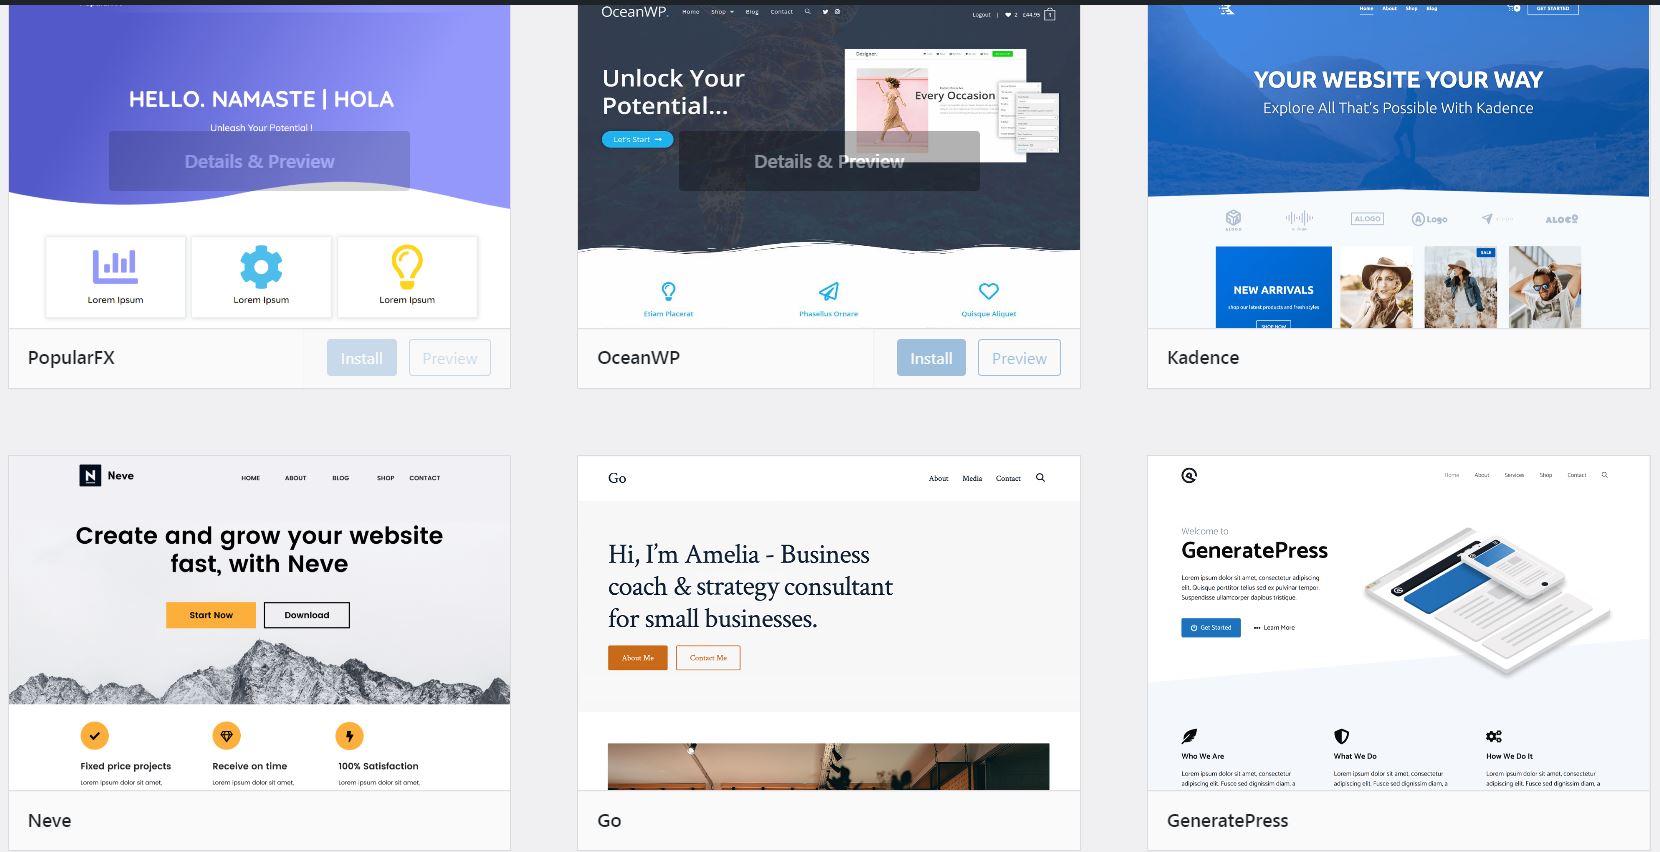
There are thousands of themes that are available for you to use for free. I personally like GeneratePress and Kadence. All of my sites are built using these two themes.
But you could search for any theme that you like based on what your blog could be, and use the search options to find the perfect blog theme for you.
You could also buy and install premium themes, I like to use SociallyViral and Ahead for some of my arbitrage sites.
2. Customize your blog
Now that you have selected a theme, it’s time to go ahead and do some finishing touches.
You can start by going to Appearance and then click on Customize. This will bring out the customizer that you can use to upload a logo, for example, change the blog layout and more.
I recommend you start out by uploading a logo first, but if you don’t have one, you could use just your site name until you get one done. You can get a good-looking logo for your blog done at some cheap prices from sites like Fiverr.
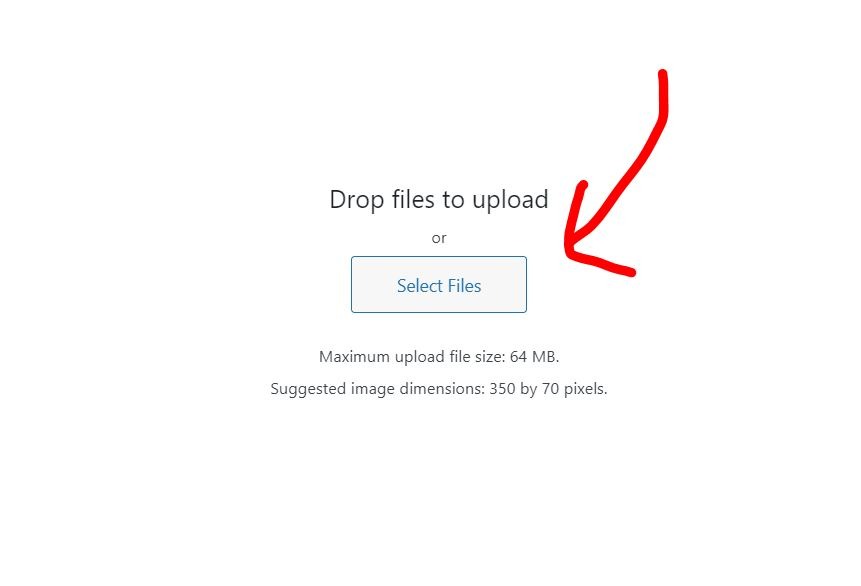
Once in the Customizer go to Site Identity, and click on select a logo, like so:
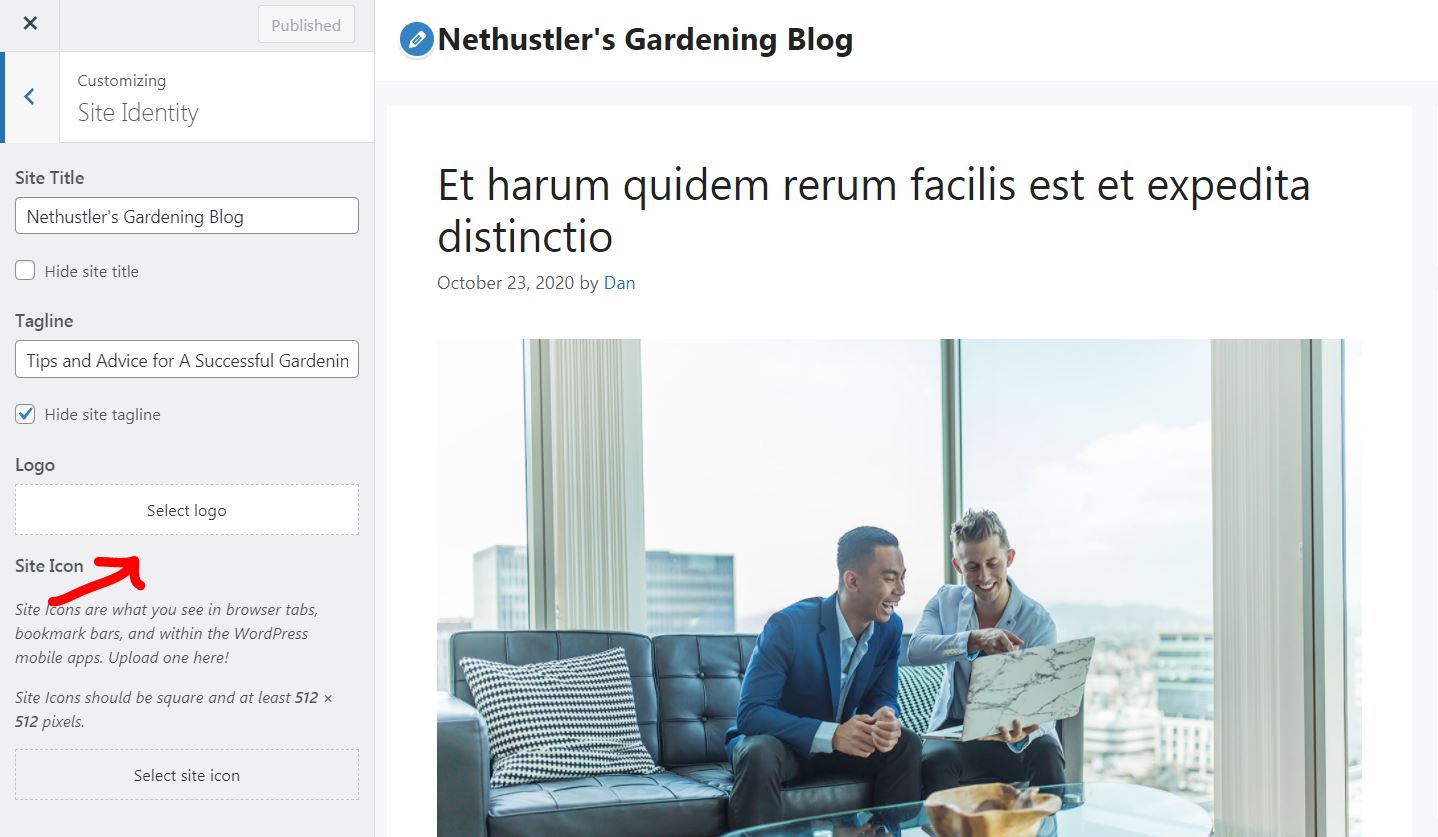
This will bring up the media upload tool where you can drag and drop your logo or image.
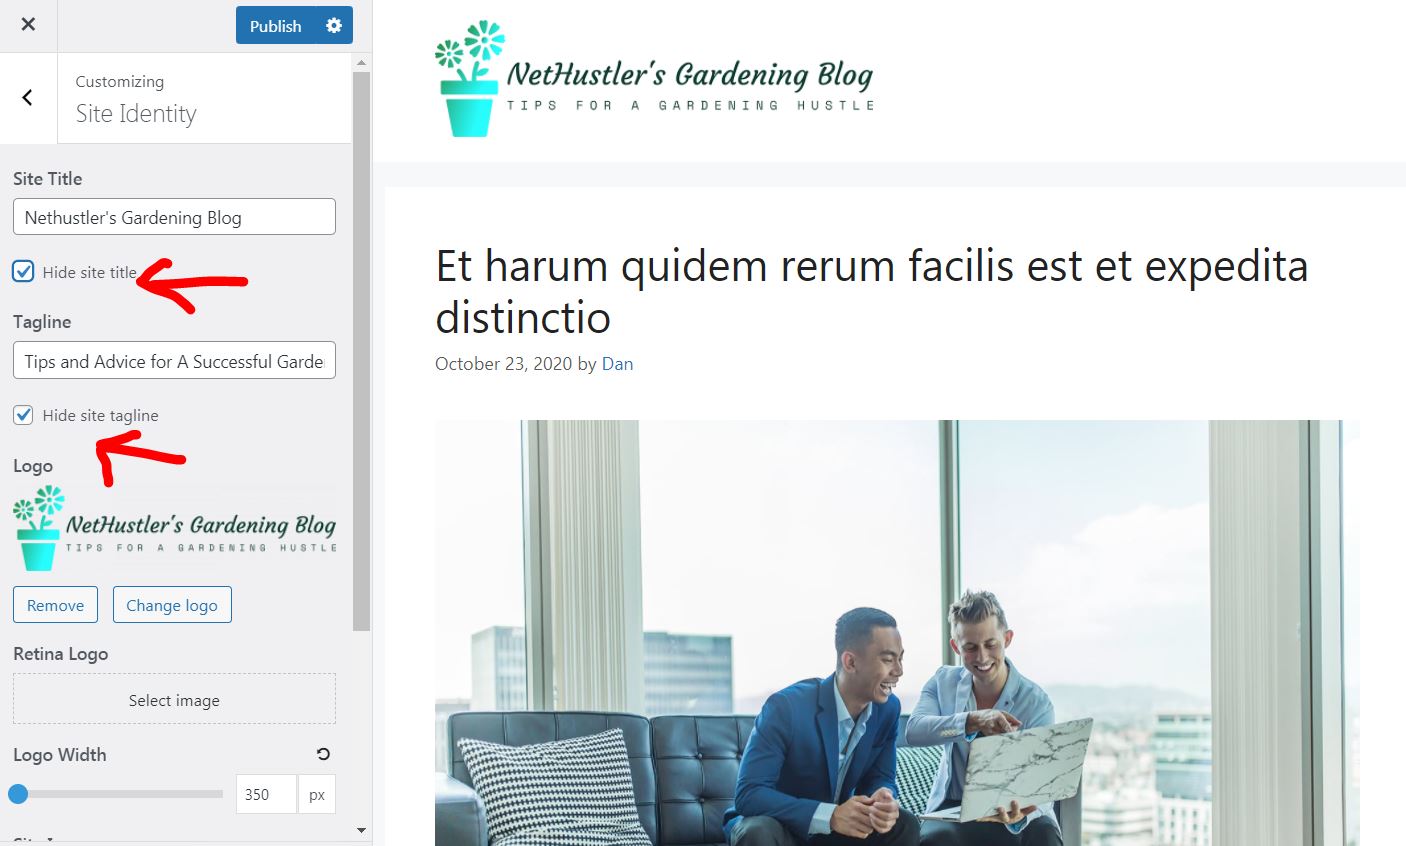
You can then select to hide your blog name and tagline and have only the logo display in the header of your blog like so:
From the same place you can also upload a favicon if you have one, which is the little icon that you see in the tab next to a website’s name.
3. Customize your blog even more
After you’ve added your logo, you can tweak your entire blog design to your liking. Just browse the customizer to get a feel and see what you can change to your blog until you’re satisfied with the look.
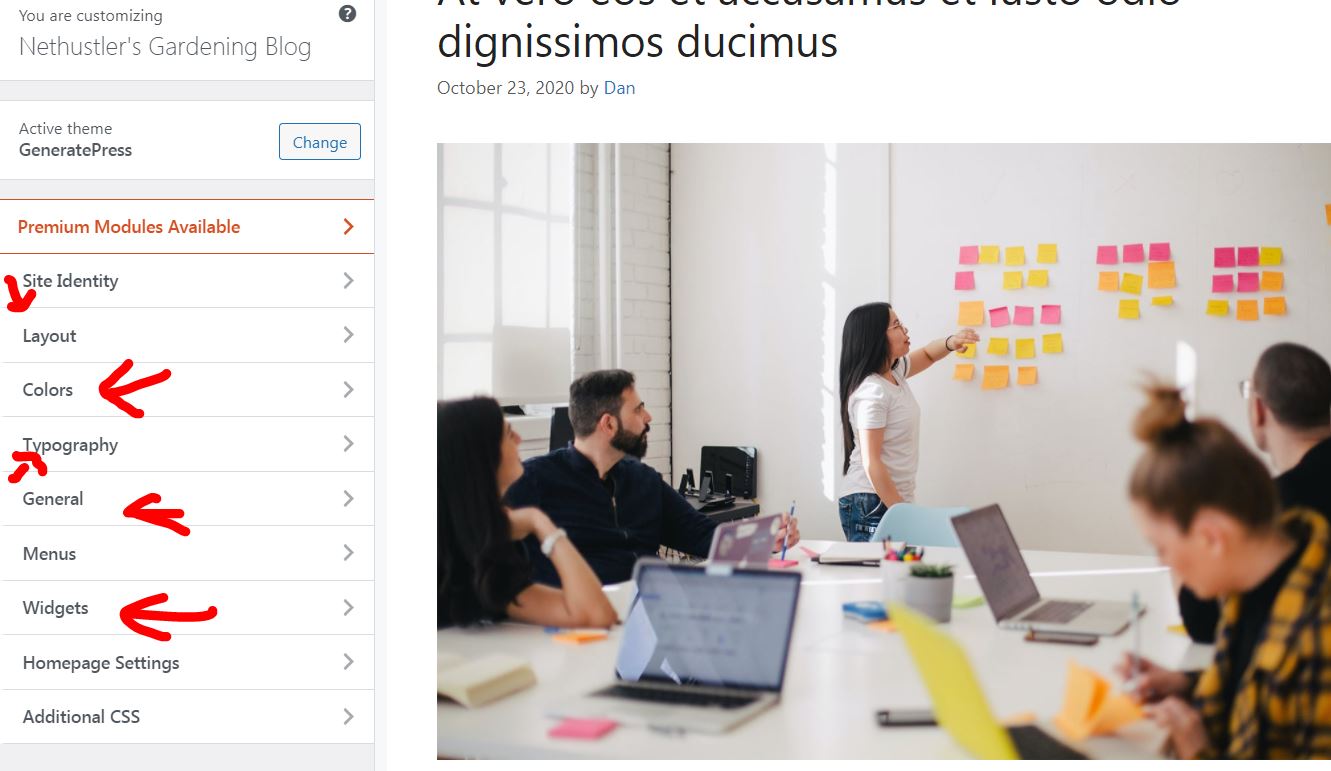
You have many options that you can go over such as:
- Colors – From here you can change the colors of your blog.
- Header – You can use this to upload a header image instead of a logo (depending on the theme)
- Menus – This is where you can set up your blog’s menu
- Widgets – You can use widgets to add more functionality to your blog
- Layout – Depending on the theme, you can change your blog layout in various ways.
- And more – Depending on what theme you’re using, you will have more customization options.
Great choice! Your blog’s design is coming together beautifully. Let’s move forward!
Step 7: Install plugins on your WordPress blog
Now that you’re done with the blog design, it’s time to install some basic plugins that will make your blogging career that much easier.
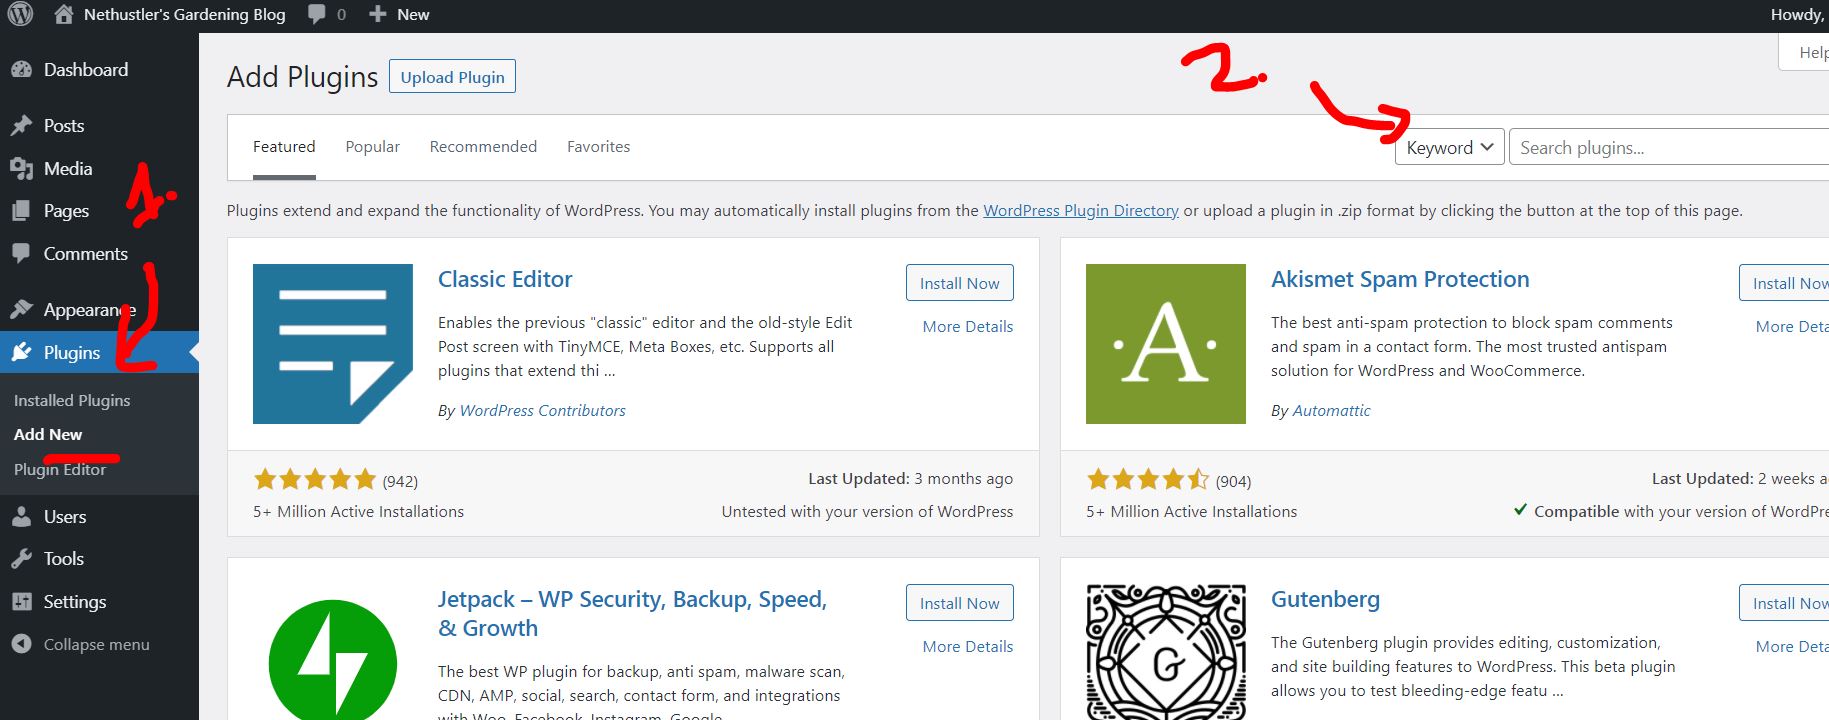
To get started adding blog plugins, simply go to Plugins > Add New, you can search plugins by name, and when you find one that you would like to install, simply click on the install button next to it and then press activate.
These are my recommended blog plugins that you should consider installing on your new WordPress blog:
- Classic Editor – By default, WordPress now comes with the Gutenberg editor installed, some bloggers find Gutenberg dreadful to work with, so we use the classic editor. So if you don’t like the way the editor looks when you’re adding new posts, then give Classic Editor a try. But in 2025, I think it’s time to get used to the default WP editor since most plugins will be focused on that from now on, so maybe skip this one.
- Yoast SEO – This plugin will make it easier for you to optimize your content for SEO (search engine optimization), which will help you in writing good articles that have a high chance of ranking in Google and thus receiving visitors to your blog.
- UpdraftPlus – I highly suggest you use a blog backup plugin like UpdraftPlus. It’s better to have it and not need it than to need it and not have it. Mistakes and errors and hacks can happen, so it’s better to be prepared and have your blog files secured.
- WP Super Cache – This plugin will optimize your blog for speed, and make it faster to load. Your blog’s loading speed is an important part of ranking higher in Google and also it provides a good user experience.
- WPforms – You’ve probably already installed this when you have gone through the Bluehost WordPress installation. WPforms is one of the most popular contact form plugins and it’s used to create a simple contact form that you can place on your contact page. No need to know how to code anymore, yay.
- MonsterInsights – Again, you have probably installed this already, but if you didn’t go ahead and install it, you will use it to add Google Analytics code to your blog. It’s totally optional and you only need to get this if you plan on using Google Analytics to learn about your blog’s visitors.
Awesome! These plugins will take your blog to the next level. Let’s keep the momentum going!
Step 8: Write and publish blog content
With the easy part now done, it’s time to go ahead and start blogging.
Since you started a blog on the WordPress CMS (content management system), you have two ways of adding content to your blog: posts and pages.
There are many types of content that you can add to your blog such as posts, images, videos, etc.
You should focus on writing great content that is useful to your blog’s ideal readers so that in turn they can share it and give your blog more exposure.
Usually, your blogging will consist mainly of you writing posts (preferably daily if you can), but you can also publish pages.
The difference between pages and posts are these:
Blog Pages – are for content that won’t change too much over time, something that’s evergreen and not time-sensitive. (e.g: an About page).
Blog Posts – these are timely pieces of content, that have categories, tags, author, published date, and are included in RSS feeds. They are also social and can be shared pretty much anywhere. Posts are your main blogging content.
Create Blog Pages
First of all, before you start blog publishing, you should create some pages that are important to have such as:
- Homepage – Depending on what type of blog you want to create, a home page might be better suited than just simply showing your latest posts.
- About – People are generally curious to learn more about the blog authors and who you are basically, so you can share some info about you on an “About me” page, think about life experiences, and how you got to where you are, your skills, etc.
- Privacy policy – Every blog needs a privacy policy page, especially if you want to be run advertising on it. There are many privacy policy generators on the internet that you can use for free, and WordPress even set’s one up for you but you have to fill it in yourself.
- Terms – Same as with the privacy page, if you offer a service or a product you might want to specify additional terms on this page so that your blog readers can know about them.
- Services – If you create a blog to promote your services, then you also need to add a Services page, and tell people about the things that you can do for them.
- Contact – Here you will put your wpforms shortcode to have a nice contact form display on your page, that users can use to get in touch with you.
How to add new pages in WordPress:
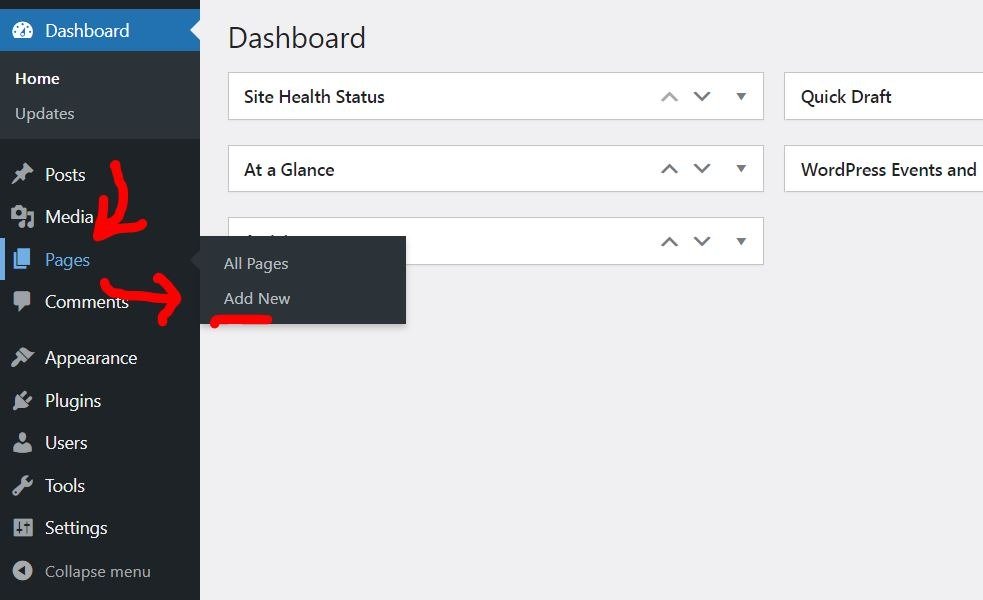
Inside your blog’s dashboard on the left side menu, hover your mouse over the Pages tab and then click on Add New, to publish a new page.
Writing Blog Posts
After you’re done with creating the pages it’s time to start writing blog posts and get some visitors to your site.
If you don’t yet have any blog post ideas, don’t worry, we’ve all been there, gradually over time as you develop your blogging skills you will know what type of posts are better suited for your audience.
Here are some helpful tips for writing blog posts:
- Stay on point – Your articles should be about a specific topic and not talk about things that are unrelated to the main topic.
- Give examples – If possible, you should include examples into your blog articles, if they are personal that’s even better.
- Create useful content – It should be useful and helpful to your readers, so you should take that into consideration before you start publishing.
- Unique content only – Needless to say, your articles should be unique, and not copy / pasted from somewhere else.
- Add images – This makes it easier for your readers to digest your content. It’s also a good way to put some space between lots of text (like I did in this blogging guide that you’re reading right now).
- Do basic SEO – You want to write articles that are easy to read and helpful for your readers, but you also want to make sure that you follow some basic SEO practices. More on this below.
Here’s how to add new posts in WordPress:
On the left-hand side menu again, you will hover over the Posts tab and then click on “Add New”. This will take you straight to the post editor where you can add and publish your posts.
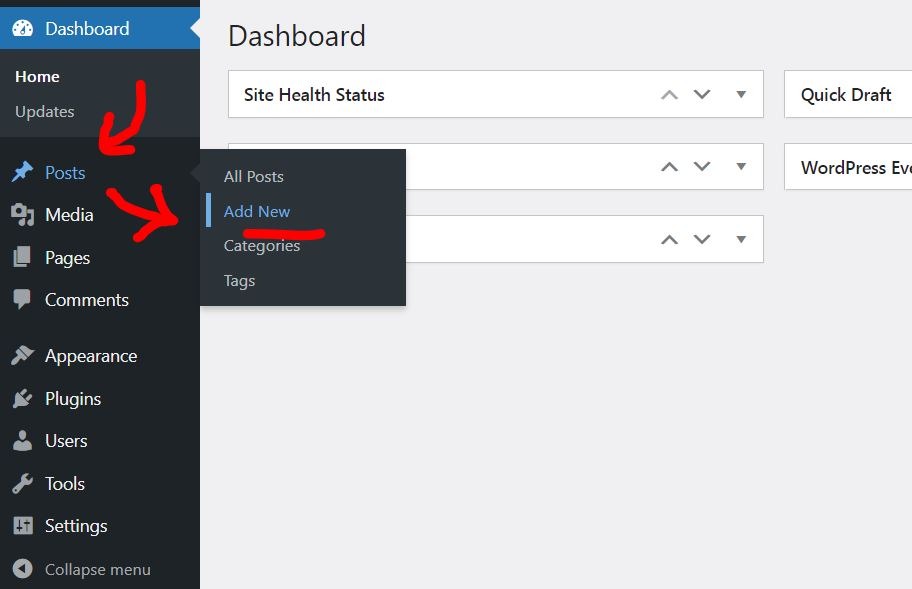
After you click on Add New, you will be redirected to the editor to write your new post. It will look like this:
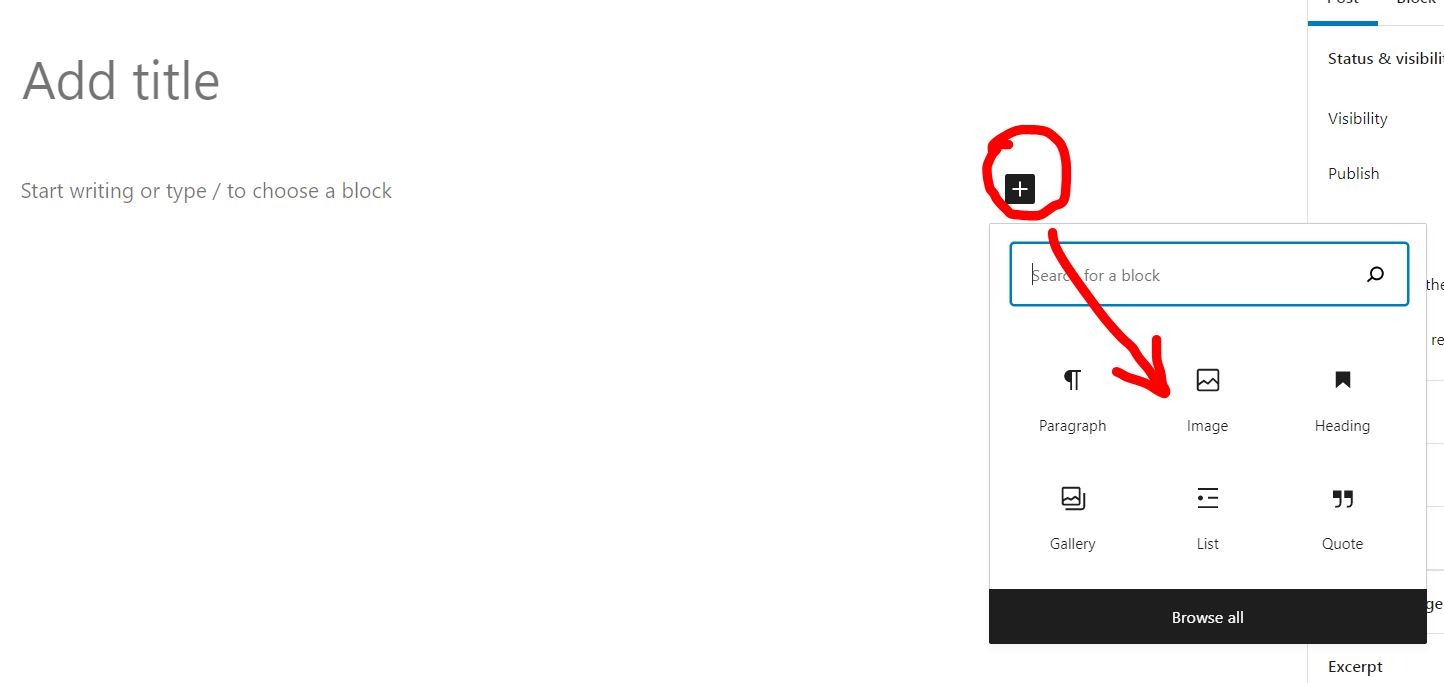
You can add your blog title at the top, and then the rest of the content below that.
By clicking on the plus button you will be able to also insert images, lists, quotes, and other good stuff.
Once you’re done writing your blog article, to make it go live, you simply click on the Publish button on the right side of the screen. Now your content is ready to be viewed by others.
You can also create blog categories so that different posts can go into different groups. This is useful if you blog about more things specific to your niche.
Fantastic! Your blog is live and kicking. Let’s fill it with more amazing content!
Step 9: Optimize your blog posts for SEO
Here’s the thing, you want your blog articles to be:
Useful for your readers – If you write great content that people find useful, it will get shared more and get more visitors.
Optimized for SEO – As well as being useful, your content should be search engine optimized (we call this SEO). This will help your blog to get traffic from Google and Bing. On the internet, traffic means visitors or people who come to your website.
Search engine optimization is the process in which webmasters (that’s you), use in order to get free traffic from organic searches such as Google, Bing, and Yahoo.
Most bloggers rely on SEO traffic to get visitors to their content. Doing some basic search engine optimization for your WordPress blog will give you higher chances of your content ranking in Google.
Here are some ways that you can optimize your blog for SEO:
1. Add the main keyword in the title
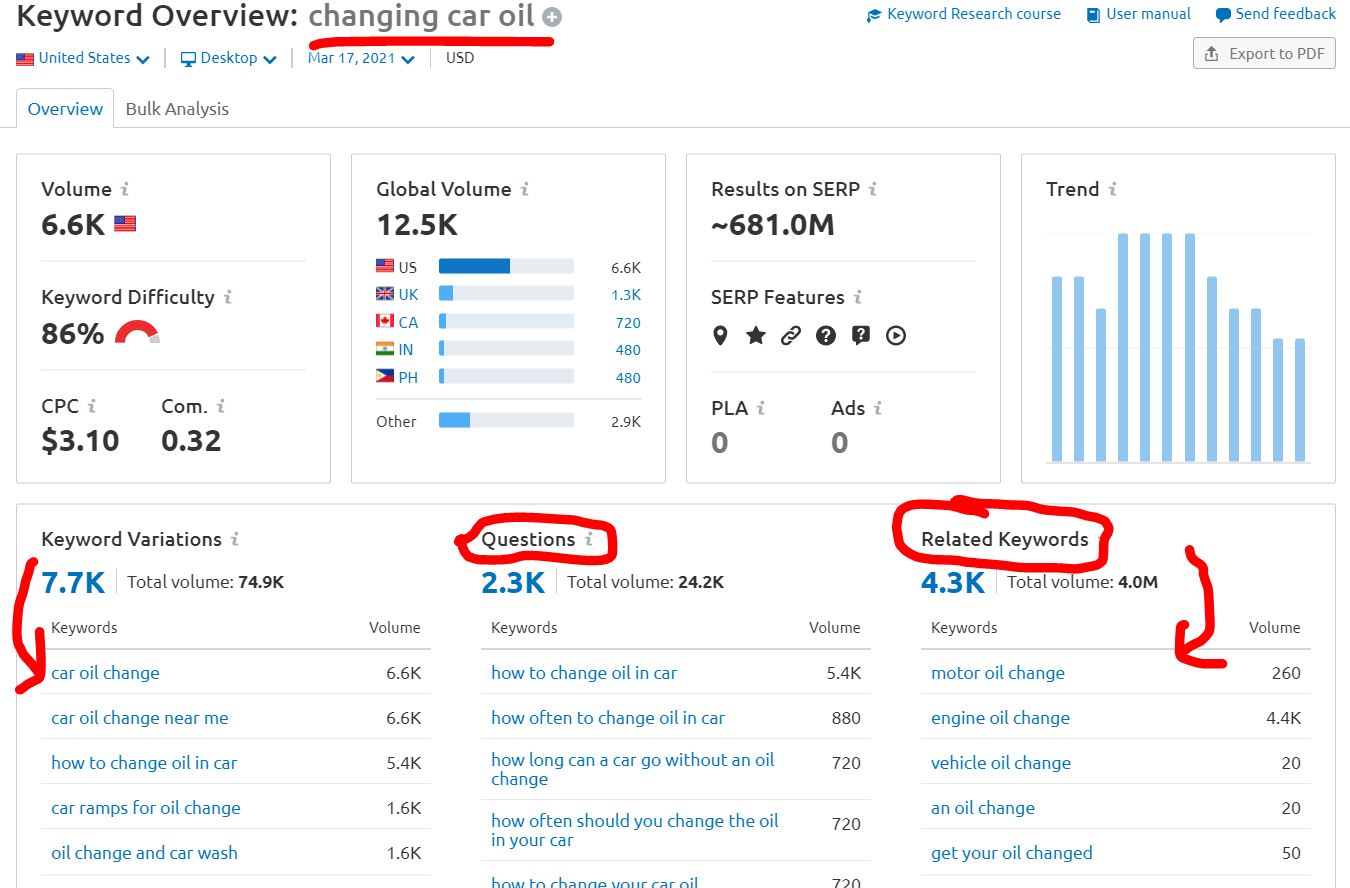
Keywords are basically a few words that are specific to that post. For example, if you want to write a blog article teaching others how to change their car oil by themselves, your main keyword would be: Changing car oil or How to change your car oil.
You can use keyword tools to get a better understand of what keywords to use and which ones are popular or hard to rank for, or which ones are good blog topics to write to make money. A popular tool I like to use for this is Semrush, here’s how that looks:
If you’re a beginner blogger you should probably try some less competitive keywords and go for related ones or variations of the main keyword.
A popular way is by writing posts that are answers to popular questions for that topic.
2. Add your keyword in the first paragraph
Likewise, you want to add the main keyword in the first paragraph of your post.
You should also add it a few more times throughout the article and include some variations of it, if you installed the Yoast SEO plugin, it will tell you what you need to do, so don’t worry about this too much.
3. Add your keyword as an alt attribute to your images
You also want to add your keyword to the images that you’re publishing inside that post. To do that you need to specify an alt attribute for your images.
An alt attribute or alternative text is what will display instead of the image if for some reason the image could not be displayed properly.
What you put in that alt is usually the main keyword or variations of it. Here’s how you do that:
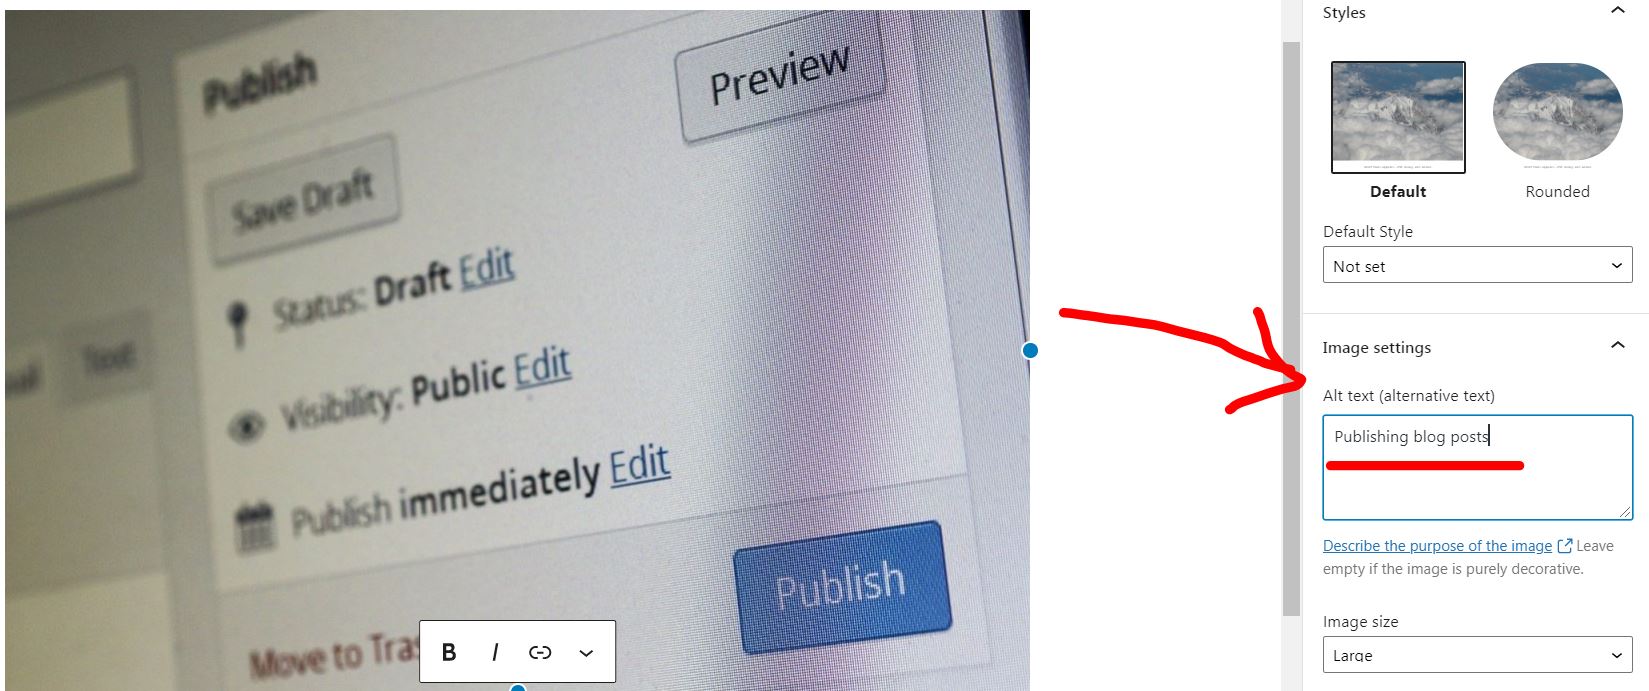
The look will vary depending on if you’re using the classic editor plugin or the newer Gutenberg. The above image is how you add an alt text with the new WordPress editor.
4. Write unique blog content
Here’s the thing, your content needs to be unique if you want your blog posts to receive free organic search traffic.
So make sure that everything you post on your blog is original. If you copy and paste content from other websites then not only won’t help with your blog’s traffic but also it’s against the law. Copyright laws are a thing you know.
5. Publish long blog content
You want to publish long blog content and not just a few words. This tells Google that you know what you’re talking about and it will give you a better chance of ranking versus if your content was low on words.
Usually, you should aim to write articles for your blog that are at least 800 words, most people write over 1,200 these days. If you do a quick Google search for any keyword, you will find that most of the results will feature articles that are high on word count.
Related: What to Do After Publishing a Blog Post
Well done! Your blog is ready to shine in search engines. Let’s keep the momentum going!
Step 10: Start promoting and getting traffic to your blog
Starting a blog and writing posts is just part of the equation. You also want to get visitors to your blog. Without them, you don’t really have an audience for who to write.
Promoting your content after you hit publish is key if you want to get thousands of monthly readers on your blog. Especially if you also want to make money blogging through affiliate links and display ads.
While SEO optimization is a way of promoting your blog and getting traffic, there are many more methods to acquire traffic to your website.
How to get traffic to your blog
1. Social media
Use social media networks to get traffic to your blog by sharing your posts every time you publish them. You should also encourage others to share your blog on their social media channels.
This way you get a huge following and you’re able to bring lots of visitors to your site without relying too much on SEO.
For example, Pinterest is a popular blog traffic source especially if you’re writing about DIY projects, home & gardening, beauty, and fashion, etc.
Many big sites get their majority of traffic from Pinterest or Facebook, so go ahead and create your page and promote your blog.
2. Comment on other blogs
You can also get visitors by simply commenting on other blogs that are related to your niche. Most of the time the comment section will allow you to add your blog URL, alongside your name and email.
So every time you make a comment, people can click on your name and visit your blog. This is also an easy way to connect with people from the same blogging community and build relationships.
3. Guest Blogging
One of the easiest ways to get more traffic to your site is by writing guest posts on other blogs. But you want to make sure that you do it on sites that are in the same niche as your blog.
You will be able to add links to your blog inside that guest post. This will help your SEO and also people will manually click on the links and visit your website.
4. Build an email list
You want to start an email list for your blog as soon as possible.
You should try and get your ideal readers to become email subscribers that way you will have a direct line of communication with them.
Every time you hit publish on a new post your readers can receive an email newsletter informing them about it and that they should come and read it.
I would recommend you build an email newsletter of 1,000 monthly readers as fast as possible.
Read more: How to get traffic to your blog
Congratulations! You’ve set the stage for success. Now, let’s drive that traffic!
How to make money blogging
Alright, so one of the biggest questions that I get is: How can you make money blogging.
Well, there are quite a few ways to earn a living from your blog. Even if you didn’t really start a blog to make money, it’s still an added bonus.
Here are some popular methods that you can use to monetize your blog.
1. Affiliate marketing
Affiliate marketing is a great way to make money with your blog. You can basically get paid if you promote other people’s products and services by simply adding affiliate links into your posts.
You can earn a full-time income blogging just by getting affiliate sales, you don’t even need to have your own product.
There are many affiliate programs that you can join such as Amazon associates, CJ.com or Shareasale.
You can find hundreds of thousands of affiliate products to promote whether they are digital products or physical, you should pick an affiliate program with products that are more suited to your niche.
Creating content that’s useful to people while adding affiliate links to it, is a nice way to earn money blogging.
But you have to keep in mind not to fill your content with too many affiliate links, as taht might ruin user experience.
Read more: Affiliate Marketing Guide
2. Insert display ads on your blog
You can also monetize your blog with display ads. A popular choice for beginner bloggers is the Google AdSense program.
I’m pretty sure you’re familiar with AdSense ads by now, you’re seeing them on probably every website that you visit. After all, they are used on more than 39,000,000 websites. That’s a huge amount of people that are monetizing their website with display ads.
To apply to AdSense you will have to first create good content for your blog that’s unique, and you should have quite a few published posts. I’m suggesting about 20 or so quality articles before you apply.
Of course, there are more ways to monetize a blog with display ads that don’t rely on Google AdSense. Some that pay even more than Adsense such as Mediavine and Raptive.
Read more: Google AdSense alternatives
3. Sell your own products
If you have your own product or service to sell that’s even better. Your blogging passive income can grow a lot simply by selling your own stuff to your target audience.
If you don’t have a product to sell on your blog don’t worry. There are many ways to create one.
For example, you could make and sell either digital products (such as an eBook or a course) or physical products. You could also earn money with membership sites.
Read more: How to monetize your website
How to create a blog: Conclusion
Wow, you’ve made it all the way down here. Congrats. By now you have probably set up a blog and you’re all excited about writing new content and all the possibilities that come with it.
If you’re nervous don’t be, I know it can be a bit daunting to learn about blogging and all the technical side of things might put you off, but you should move past that.
Blogging can be a lot of hard work, but with time it can be quite an easy and enjoyable activity that can also bring you a nice income.
There are many great reasons to start a blog as I’ve said in the beginning, and pretty much anyone with internet access and a few dollars can do it.
Whether you want to create a blog to make money, or just for sharing your experiences with the world, I hope this step-by-step blogging guide was helpful for you.
Frequently Asked Questions
What makes a successful blog?
A blog can only become successful if you’re passionate about the things you wish to share with others.
Without passion, you won’t have the motivation to write content that is helpful to others and that also ranks well in Google.
So even though it might sound a bit cliche, it’s true, the difference between a great blog that earns you money and a failed one is you. How much time you dedicate to write great content and promote it, will decide how great your blog can become.
Is starting a blog worth it?
Yes, absolutely, starting a blog is worth it. Provided that you have enough passion for a specific topic that you would like to blog about.
You don’t even need to have a niche to get started blogging, you can just post about your personal experiences from your day-to-day life and share them with your ideal readers.
It’s worth having a blog because you can bring more exposure to you, and if you want to advance in a career or if you want to quit your job altogether, then blogging is a great way to help you achieve that.
Should I start a blog on WordPress?
Yes, I highly recommend you start a blog on WordPress. Specifically the WordPress.org platform and not the free .com one.
This way, you will be free to do whatever you want and monetize your blog with every method that suits your niche best. With free blogs like Blogger, you can’t really do that.
So for full flexibility and control and to access thousands of themes and plugins that will make your blogging career much easier, I suggest you blog on the WordPress platform.
What do you need to start a blog?
You need to register a domain and get a web hosting plan in order to start a blog.
But the easiest way for beginner bloggers is to simply go over to Bluehost, sign up for a plan, and you can create a WordPress blog in just a few clicks.
How many blogs can one person have?
A person can have unlimited blogs. It’s just a matter of time and attention that you need to dedicate to each blog that will put a limit on how many blogs you can manage.
If you delegate and outsource everything from writing articles to optimizing your WordPress site, then you can run many blogs.
I personally run about 7 blogs nowadays, the number varies if I decide to sell one and invest more time and money into others, or if I want to buy a blog to increase my portfolio.
How do I rank my blog post?
To rank your blog post you will have to write amazing and helpful content for your users.
Also make sure to use basic SEO techniques, such as using keywords in your title, URL slug, and variations of that keyword throughout your article.
Using a plugin like Yoast SEO will help you out by giving you instructions on how to write a blog post that ranks.
Building backlinks either through guest posting will also help increase your organic traffic.
Is it too late to start a blog?
In life, it’s never too late to start anything. So, no. It’s not too late to start a blog either.
There are many people from all over the world and from all age groups and social aspects of life that get started blogging every day.
Heck, I even thought my 50 something-year-old mom how to start a cooking blog.
So yeah, go out there and do it.
What are profitable blog niches?
There are many profitable blog niches, such as personal finance, health, fitness, fashion, marketing, etc.
But to be honest with you, it doesn’t matter. You could have a blog about ants and still make money blogging.
Why? Because if you have a large enough audience you can earn a living from your blog on any niche.
It’s just a matter of how you monetize your blog rather than a matter of niche. You can use display ads to monetize almost every niche out there.
So in theory all blog niches can be profitable. What matters most is your content, and how much traffic you get to your site.
How do bloggers get paid?
Bloggers get paid depending on how they choose to monetize their blog, and if they have enough traffic to be able to earn money.
If you monetize your blog via display ads, for example with Google AdSense, then Google will have different payment methods for different countries.
In general, they will pay you on the 21st of the next month for the previous month of revenue, and they will send you the money directly to your bank account.
It’s the same with affiliate marketing so depending on the affiliate program, you will have different payment methods.
How often should I blog?
There is no set program for how often you should blog. However, if you want to have a successful blog, and get lots of organic traffic you will have to write quite frequently.
Aim for at least 1-2 posts per week. If you can write a blog post a day, then that would be great for your SEO. Of course, if the content that you write is of high quality and useful.
In general, though it depends on you and how much free time you have to dedicate to blogging.
Why do Blogs fail?
There are many reasons why a blog can fail. Oftentimes bloggers get discouraged because they don’t get enough visitors to read their posts. Others will stop blogging because they don’t earn enough money.
Most bloggers fail because they started a blog in the right niche, on something that they’re not passionate about. I know I failed a ton when I first started out simply because I wasn’t interested in what I was writing.
At least that’s my answer, in reality, it could be a number of things.
How many blog views do you need to make money?
Aim to get at least 10,000 visitors a month, from that moment on you could see some good money coming in. But again it depends on how you decide to monetize your website.
With display ads, you will need a lot more visitors to make money blogging.
If you go with affiliate marketing though, you might make a couple of hundred or even thousands of dollars a month with a few thousand visitors that you can direct to your affiliate links.
So in reality, again it depends, on what niche you’re in, and how you’re monetizing your website.
How do I write my first blog?
You start a blog using the guide on this page and then go to your blog’s dashboard, click on Posts then on Add New, write your content, and hit Publish. Ta-da.
You’ve just written your first blog.
Look, I know you want a more serious answer to this question, but in reality, like all things in life you just have to go for it.
Don’t be afraid if you’re not a good writer or an expert at something. With every blog post that you publish, you will get better and better and you will easily get blog post ideas after a while.
Are blogs dead in 2025?
Nope, blogs aren’t dead in 2025, and they won’t be probably until the end of the internet. In fact, more people create a blog now than ever.
WordPress is used on 33% of all the websites on the internet. That’s millions of websites. Sure most of them aren’t blogs. But the majority are though, so that’s what counts.
As long as people will find blogging enjoyable and others use it as a way to earn a living, it won’t die. It’s that simple really.
Plus, with so many people nowadays looking to make money from home, it’s even becoming more popular. The blogging community is growing every day.
What is personal blogging?
Personal blogging is simply put when you blog about you or your experiences on things, and basically, you’re the only author of that blog.
You’re also adding your own personal touch to every blog that you write, so that makes it even more special.
It’s different from a company blog because most of the time a company is using blogging as a tool to bring in more leads and clients for their service, so their blog posts are not that natural and are used with business in mind.
How long does it take for a blog to get traffic?
If you’re waiting to rank your blog posts into search engines and get traffic that way then you should expect to wait about 3 to 6 months on average.
There are quite a few ways to get traffic to your blog without waiting for SEO though.
Read more: How to get bring traffic to your blog.
How do I install Google Analytics on my blog?
It’s pretty easy to install Google Analytics on your blog if you’re using a plugin like MonsterInsights or something similar.
If not you should copy and paste the code straight into your theme’s header.



Super helpful! The tips on themes and plugins were exactly what I needed. I had no idea where to start, but this guide has given me a solid foundation. I’ll definitely be bookmarking this for future reference.
Good
Great point! Monetizing is indeed challenging and should ideally follow substantial traffic and strong reader engagement. Focusing on increasing page time first will set a solid foundation for effective monetization
Indeed, more page time = more revenue.
Cheers,
Stephen
This is the actual guidance which can help me a lot to start blogging channel. I shared your website address with my friends, always write like this.
Thanks for reading 🙂
Thanks for share your article
My journey into blogging was finally made possible by this guide. Thank you for such a detailed article, Stephen.
You’re welcome, glad you liked it.
This is the guide that I needed to finally start my blogging journey. Thank you Stephen for such an in-depth article.
You’re welcome, good luck with the blog.